Reloading With the GunTechs: .300WM With Red
In this detailed walkthrough, Red from Brownells demonstrates the full reloading process for .300 Winchester Magnum—a powerhouse cartridge favored for hunting and long-range shooting. Using premium tools like the Area 419 ZERO Press, Hornady dies, and Sierra GameKing bullets, he shows how to handload consistent, precision rounds from start to finish.
What You Will Learn
Viewers will learn every step of the reloading process: case prep, sizing, priming, powder charging, and bullet seating, all with pro-level gear. Whether you're new to reloading or refining your technique, this video teaches how to load safe, accurate, and repeatable magnum rounds.
Benefit
More consistent performance, tailored loads for your rifle, and deeper confidence in your long-range shooting.
Introduction
In this video, I walk you through the full process of reloading .300 Winchester Magnum using some of the best tools in the reloading world. This is a great cartridge for long-range shooting and hunting, and getting the most out of it means taking care during each stage of the handloading process.
Whether you're new to reloading or just looking to brush up on techniques, this guide covers everything from case sizing and priming to powder charging and bullet seating, using top-tier equipment like the Area 419 ZERO Press, Hornady dies, and Sierra GameKing bullets.
Reloading Equipment and Components
Here’s what I used for this load:
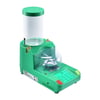
- Area 419 ZERO Press with inline fabrication stand
-
Hornady dies
-
Area 419 powder funnel
-
Nosler pre-prepped .300 Win Mag brass
-
Winchester Large Magnum primers
-
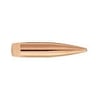
Sierra GameKing 200-grain bullets
-
RCBS powder trickler
-
Imperial sizing wax
This setup allows for precise, repeatable reloads—ideal for a magnum round like the .300 Win Mag.
Step 1: Sizing and Depriming the Case
I begin by setting up the sizing and depriming die in the press. The die is adjusted so it just "kisses" the shell holder at the top of the press stroke. Once it’s in the right position, I lock the die collar down.
Before running the brass through, I apply a light coat of Imperial sizing wax to the outside of the case and just a touch inside the case mouth. This helps prevent the brass from sticking and avoids damaging the expander ball.
After that, I run the brass up into the die to resize it and pop the spent primer out. Make sure your decapping stem is secure and torqued down properly to avoid shifting during the stroke.
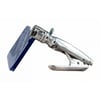
Step 2: Priming the Case
Next, I use a Frankford Arsenal hand priming tool to seat a fresh Winchester Large Magnum primer. I place the case in the shell holder, unlock the primer tray, and give it a firm squeeze.
To check for proper seating:
- Run your finger over the primer—it should be flush or slightly below the base
-
Set it on a flat surface—if it wobbles, the primer is proud and needs to be reseated
Step 3: Charging the Case with Powder
I move to the RCBS powder trickler, which is already loaded with the correct powder and set to my preferred charge based on printed load data. I place an Area 419 powder funnel with a .30-caliber insert on top of the case.
Once the charge is trickled and the scale beeps, I pour the powder into the case and wait for the trickler to reset. This setup is great for precision rifle loads, ensuring exact charges every time.
Step 4: Setting Up the Bullet Seating Die
Now that the case is charged, I rotate the turret on the ZERO Press and install the seating die. I adjust it so it just contacts the case mouth, then lock the collar down.
With the seating stem backed out, I place a 200-grain Sierra GameKing bullet into the case mouth. Slowly, I bring the ram up and turn the seating stem until it just touches the bullet.
From there, I lower the case, adjust the stem slightly deeper, and check the overall length using digital calipers. After a couple small tweaks, the bullet is seated to my pre-measured chamber spec.
Once I hit the right length, I lock down the seating stem collar.
Step 5: Running the Process in Real Time
With everything set, I run through the full process in real time:
- Lube and resize a case
- Prime it
- Drop the powder charge
- Seat the bullet
This process, when done in batches, becomes much more efficient. I always recommend reloading in stages—resize all your brass, then prime, then charge, and finally seat bullets. It keeps everything cleaner and minimizes the risk of skipping steps.
Final Thoughts
That’s it! We’ve just reloaded a complete .300 Win Mag round, and the process is as straightforward as it is satisfying. Reloading this cartridge gives you the flexibility to tailor loads to your rifle and application—whether that’s hunting or precision shooting.
If you have any questions about reloading tools, techniques, or components, feel free to reach out to our Brownells Tech Line. We’re always here to help.
Thanks for watching, and we’ll see you next time.