The Ultimate Backpack AR-15
Synopsis
Caleb from Brownells introduces what he calls his ultimate backpack gun build for 2025. The goal is to create a compact AR pistol setup that fits discreetly into a small bag, deploys quickly, and uses high-quality components that are well thought out for real-world function. Central to the build is the Law Tactical ARIC (AR Internal Carrier) paired with the new Law rap 1913 adapter, allowing for a folding, recoil-contained AR system. You Can purchase both from Brownells here: LAW ARIC & 1913 Adapter Plate
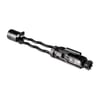
Law Tactical ARIC and Wrap System Overview
Caleb explains the benefits of using the Law Tactical ARIC, which replaces a traditional buffer system and enables reliable operation without a buffer tube. This opens the door for compact setups, especially when combined with the Law Tactical Wrap, a fixed 1913 adapter that replaces the folding hinge mechanism from previous Law Tactical products. The result is a clean, compact, and lightweight AR pistol configuration.
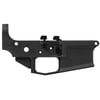
Lower Receiver Selection and Setup
The lower receiver for this build is a Aero Precision PRO stripped lower. Caleb likes the quality and tight tolerances Aero is known for. This will serve as the foundation for the rest of the build, which is carefully assembled with both performance and concealability in mind.
Trigger and Safety Install
For the trigger, Caleb installs a BCM. It's a standard single-stage mil-spec trigger with subtle improvements that enhance reliability and feel. He also begins installing the safety selector at this stage, prepping the receiver for the next set of controls.
Greasing and Assembly Tips
As always, Caleb emphasizes the importance of using grease or oil during assembly. Applying lubrication to detent holes, springs, and threads prevents corrosion and makes future disassembly easier. It also helps prevent galling on aluminum parts, which can occur without proper lubrication.
Ambidextrous Selector Setup
The safety selector being used is ambidextrous, also from Forward Controls. Caleb discusses how to properly install the selector, including the use of the correct detent and spring. He stresses that proper placement and greasing here are small steps that make a big difference in long-term performance.
Grip Installation and Detent Greasing
With the selector in place, he installs the grip—a modern AR-style design that provides good hand placement while maintaining a compact profile. Before installing, he adds grease to the selector detent spring, an often-overlooked detail that prevents future issues.
Selector Lever Pin Installation
This section covers how to install the selector lever screw or pin, depending on the brand of ambi selector you're using. Caleb recommends applying Loctite if needed and tightening to spec, especially if you're not using a captured design.
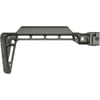
Installing the Law RAP Adapter
Now Caleb installs the Law Tactical RAP adapter, which replaces the rear end of the lower receiver where a buffer tube would typically go. The Wrap includes a flange and bolt-on adapter that supports 1913 brace or stock interfaces. Proper orientation is key here, and Caleb carefully walks through aligning and securing the adapter with the included hardware.
Takedown Pin and Spring Fitment
One of the trickier parts of installing the Wrap is retaining the rear takedown pin spring and detent. Caleb shows how to use a captured pin to keep everything in place, ensuring the takedown pin functions smoothly while fitting under the rear plate of the Wrap system.
Proper Torque for RAP Flange
With the flange aligned, Caleb tightens the mounting bolts and shares torque specs. It’s important not to overtighten or misalign the flange, as this affects the rear interface for the brace or stock and could cause function issues with the ARIC carrier.
Set Screw Installation Warning
Caleb takes a moment to warn viewers about the critical step involving the set screw inside the RAP. This screw retains the takedown pin detent and must be installed before attaching the top plate. If forgotten, the detent will launch or cause pin retention issues, and reinstalling it after the fact requires partial disassembly.
Reinstalling the Rear Plate and Function Check
With the detent captured and the RAP flange secured, Caleb attaches the top plate, completing the rear of the lower receiver. He performs a full function check on the fire control group and safety selector before moving on to the upper assembly.
Upper Receiver and Barrel Setup Begins
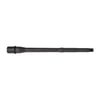
The upper used for this build is a Brownells receiver paired with a 12.5-inch lightweight barrel. This length offers excellent balance between ballistics and compactness, especially for a gun meant to be stowed and deployed quickly. Caleb prepares to install the barrel, gas block, and handguard.
Brownells Lightweight Barrel Specs
Caleb closes this portion of the build by detailing the specs of the barrel: 12.5 inches, 1:7 twist, chambered in 5.56, and paired with a low-profile gas block. This choice complements the compact, no-buffer system and keeps the rifle lightweight without compromising performance.