Customer Build: Jennifer WIlliams Competition AR15
Introduction
Caleb and Jenn begin the session with an overview of the project. They will be assembling a full AR-15 rifle, explaining every component and step from installing the safety selector to the optic setup. Caleb emphasizes how hands-on the process is and assures that this build will result in a competition-ready firearm.
Safety Selector and Pistol Grip Assembly
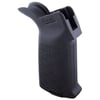
The team starts with the installation of the safety selector and grip. Caleb explains how the detent and spring align within the receiver, and how grease helps keep small components in place. He demonstrates how to properly seat the safety and secure the pistol grip with its screw. They also touch on grip plug storage ideas in a lighthearted exchange.
Buffer Tube, Castle Nut, and End Plate
Next, they install the buffer tube and castle nut. Caleb walks Jenn through aligning the buffer retainer, threading the receiver extension, and ensuring the castle nut locks the end plate securely in place. They discuss the importance of staking the castle nut, which prevents it from backing out under recoil.
Installing the Magpul SLS Stock
Jenn installs the Magpul SLS stock using parallel pliers to compress the adjustment lever. Caleb explains how the tool prevents marring the finish. Once installed, they test the movement and discuss fit and comfort.
Buffer Spring and Retainer Setup
They install the buffer spring and detent, using grease to hold parts in place. Caleb introduces MagSlick dry lubricant, which reduces buildup inside the buffer tube. Jenn installs the spring and buffer with Caleb's guidance.
Rear Takedown and Trigger Lubrication
Lubrication is applied to the trigger sear and components to ensure a smooth pull. Caleb walks through a function check, confirming that the safety blocks the trigger and the fire setting works correctly. He also discusses installing the rear takedown pin and preparing for the buffer system.
Function Check and Trigger Test
After completing the lower assembly, they verify the functionality of the safety and trigger. Caleb performs a dry-fire test to ensure the installation is correct. The buffer tube is firmly in place and properly staked.
BCM Buffer System and Castle Nut Staking
The build continues with the installation of a BCM recoil mitigation system, which offers smoother cycling. Caleb stakes the castle nut using a punch, explaining the purpose of locking the nut into place. The team bonds over a humorous conversation about steak while demonstrating the process.
Attaching Magpul Stock and Buffer Spring
Caleb and Jenn finalize the stock installation and insert the buffer and spring. They confirm everything is snug and properly seated before moving on to the upper receiver build.
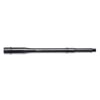
Upper Receiver and Barrel Installation
Using a Midwest Industries upper receiver rod in the vise, they install the Radian barrel and torque the barrel nut. Caleb shows how to apply grease to the threads and the barrel extension. The components are aligned and torqued to 65 foot-pounds for a secure fit.
Torqueing the Barrel Nut
Jenn torques the barrel nut under Caleb's instruction. They demonstrate why re-torquing is important for proper thread engagement and even tension. The process ensures the upper is prepared for the gas system and handguard.
Installing Gas Tube and Wilson Combat Gas Block
The gas system is assembled by installing a gas tube into a Wilson Combat gas block. Caleb shows how to align it properly so the rifle cycles correctly. A roll pin secures the tube, and they use a block to steady it while hammering. The gas block is slid over the barrel and aligned with a dimple for secure installation.
Installing Handguard and Torqueing Screws
The handguard is installed by sliding it onto the barrel nut and securing it with torque screws in a star pattern. Caleb emphasizes proper torque to avoid over-tightening. They ensure the handguard aligns with the upper receiver for a seamless look and feel.
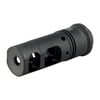
Surefire Muzzle Brake and Spacer Installation
The Surefire muzzle brake is installed along with a spacer to ensure legal length. Caleb explains how to use the spacer to meet 16.1-inch requirements. The brake is snugged against the spacer before being pinned and welded for a permanent attachment.
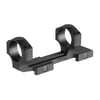
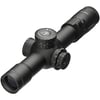
Mounting the Leupold Mark 5HD Optic
They mount the Leupold Mark 5HD scope using rings, aligning the optic with the receiver rail. Caleb uses a scope leveling tool to ensure proper orientation. The optic is torqued to spec and checked for even gaps, ensuring a professional finish.
Stock Fitment and Eye Relief Setup
Jenn adjusts the stock to her preferred length of pull, considering use with a plate carrier. Caleb checks the eye relief and optic position while confirming that the mount is secure. They push the mount forward against the rail before final torque.
Scope Mount Leveling and Torque
The final torqueing of the scope rings is performed in a star pattern. Caleb makes sure everything is level and secure. Attention to detail here ensures the scope performs consistently during recoil and changes in environment.
Tiger Claw and M-LOK Accessories Install
A Tiger Claw foregrip is added using M-LOK hardware. Caleb explains how to engage the locking lugs and align the grip for Jenn’s hand position. They also install Magpul M-LOK rail panels for added grip texture, ideal for wet or dusty conditions.
Final Fit, Finish, and Wrap-Up
With the rifle fully assembled, Caleb and Jenn admire the final result. Caleb reminds viewers that the bolt was headspaced to the barrel beforehand. They discuss additional resources for learning about headspacing and invite viewers to explore more content or reach out to the Brownells tech line.
Shop Products Used In This Build
- SONS OF LIBERTY GUN WORKS V2 COMBAT GRADE 5.56X45 NATO RIFLE BARRELS FOR AR-15
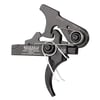
- GEISSELE AUTOMATICS LLC SSP SINGLE STAGE PRECISION TRIGGERS FOR AR-15
- SUREFIRE AR-15 SFMB-556 MUZZLE BRAKE 22 CALIBER
- LEUPOLD MARK 5HD 2-10X30MM FFP RIFLE SCOPE
- LEUPOLD MARK IMS SCOPE MOUNT
- WILSON COMBAT AR-15 LO-PROFILE GAS BLOCK .750" BLACK
- SONS OF LIBERTY GUN WORKS GAS TUBES FOR AR-15
- BRAVO COMPANY AR-15 MK2 RECOIL MITIGATION SYSTEM
- RADIAN WEAPONS MODEL 1 BUILDER KIT
- MAGPUL MOE SL-S®COLLAPSIBLE MIL-SPEC CARBINE STOCK FOR AR-15
- SONS OF LIBERTY GUN WORKS 5.56X45MM NATO BOLT CARRIER GROUP FOR AR-15
- MAGPUL MOE® GRIP FOR AR15/M4