Product Spotlight: The Henry Single Shot .350 Legend H015
Introductions
Caleb from Brownells begins the video by introducing a practical deer season setup using the Henry H015 single-shot rifle chambered in 350 Legend. This rifle is a classic choice for hunters who prefer simplicity, reliability, and precision in the field. Caleb explains that the goal of the video is to prepare this rifle for Iowa whitetail season by adding a scope, base, and rings, all while keeping the setup affordable and functional.
Henry H015 in 350 Legend Features
The Henry H015 is chambered in 350 Legend, a straight-wall cartridge known for its excellent performance on whitetail deer. Caleb points out that the cartridge offers a great balance of low recoil and stopping power, making it ideal for hunters in states where straight-wall cartridges are required.
The rifle features a break-open action with a simple extractor at the bottom to remove spent casings. It’s lightweight, easy to maintain, and offers a classic, straightforward design that appeals to traditional hunters.
Single-Shot Operation and Hammer Safety
Caleb demonstrates how the Henry H015 operates. The shooter uses the lever at the rear to open the action and manually cocks the hammer before firing. He reminds hunters never to cock the hammer until they are ready to shoot.
This safety feature makes the rifle especially suitable for hunting from a blind or tree stand. The single-shot design also encourages deliberate, accurate shooting—something seasoned hunters often appreciate.
Adding a Hammer Extension Recommendation
While setting up the rifle, Caleb recommends adding a hammer extension. This small accessory attaches to the hammer and makes it easier to operate when using a scope. Without it, reaching the hammer can be difficult, especially with optics mounted close to the action. Once the scope is installed, the need for the hammer extension becomes clear, as it significantly improves accessibility.
Removing Plug Screws and Scope Base Prep
Before mounting the scope base, Caleb removes the three plug screws on the top of the receiver. These screws protect the mounting holes at the factory but need to be taken out to install the base.
He mentions that while the Henry H015 comes with factory iron sights—a gold bead front and adjustable rear—they can be used effectively without a scope. However, for improved accuracy and longer shots, adding an optic is highly recommended.
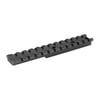
Installing the EGW Evolution Gun Works Base
Caleb installs an EGW (Evolution Gun Works) one-piece scope base, a trusted option for many gunsmiths. He explains that EGW offers bases for a wide variety of firearms, making it easy to find one for almost any rifle.
Using a T10 Torx bit and medium-strength thread locker, he secures the base with three screws. Applying a small amount of thread locker helps prevent the screws from loosening due to recoil or vibration during use.
Mounting with Thread Locker and Torque Wrench
Once the screws are started by hand, Caleb uses a Brownells torque wrench set to 15 inch-pounds to secure them evenly. Proper torque ensures a solid and level base, which is crucial for maintaining zero. He emphasizes not to overtighten the screws, as doing so could strip the threads or damage the base.
This careful approach ensures a reliable mounting platform for the scope without risking damage to the rifle’s receiver.
Selecting Scope Rings and Mounting Tips
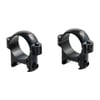
For this build, Caleb selects Burris Z-Rings, which are known for their strength and precision fit. These rings are budget-friendly yet high-quality, making them a great option for hunters who want reliability without overspending.
He also notes that the rings use a one-piece design with a fixed clamp, which differs from traditional floating-style rings. This design helps ensure that the rings stay properly aligned during installation.
Installing Burris Z-Rings and Torque Values
Caleb installs the Burris Z-Rings onto the EGW base by sliding them into position and securing them with crossbolts. He makes sure to push each ring forward in the rail slot before tightening. This ensures the rings stay locked in place under recoil.
While Burris does not provide a specific torque value for the base crossbolts, Caleb prefers to tighten them by hand until snug, ensuring the mount remains stable without overtightening.
Scope Alignment and Leveling Process
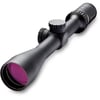
With the rings mounted, Caleb moves on to scope installation. The optic for this setup is the Burris Fullfield E1, a scope specifically designed for 350 Legend with a built-in bullet drop compensator (BDC) reticle. This reticle helps hunters make accurate shots out to a few hundred yards with standard loads.
He loosely attaches the top halves of the rings, aligning the scope so that it sits evenly and can still rotate for leveling. Proper alignment ensures accuracy and prevents stress on the scope tube.
Using Friction Paper for Secure Mounting
Burris includes friction paper inserts with the Z-Rings. Caleb explains that these small adhesive strips are placed inside each ring half to improve grip on the scope tube and prevent slipping under recoil.
He carefully applies friction paper to all four ring halves—both top and bottom. This step enhances grip and helps protect the scope finish from scratches or marring during installation.
Eye Relief and Ring Adjustment
Caleb positions the scope for proper eye relief, ensuring a clear sight picture when shouldering the rifle. For most shooters, he recommends placing the scope about half an inch forward of the hammer lever.
He checks alignment by mounting the rifle to his shoulder and confirming a full field of view through the scope. Once satisfied, he evenly tightens the screws while keeping the gaps on each side of the rings symmetrical.
Leveling the Scope with an Arisaka Tool
To guarantee perfect alignment, Caleb uses an Arisaka scope leveling tool. This simple device sits on the rail and aligns against the bottom of the optic, ensuring that the reticle is perfectly horizontal.
A properly leveled scope prevents canting errors and ensures that adjustments for elevation and windage track correctly. Once the reticle is level, Caleb tightens the ring screws to the specified torque range of 30 to 35 inch-pounds.
Torque Specs for Final Tightening
Caleb emphasizes the importance of adhering to the manufacturer’s torque specifications for the scope rings. Overtightening can distort the scope tube, while undertightening can cause the optic to shift under recoil.
Using a quality torque wrench ensures consistent pressure across all screws, maintaining alignment and zero over time.
Final Overview and Hunting Setup Tips
With everything installed, the rifle setup is complete. The Henry H015 in 350 Legend is now a dependable and accurate deer rifle, ready for hunting season. Caleb notes that the only additional accessory worth adding is the hammer extension, which makes cocking the hammer much easier with a mounted scope.
He also suggests adding a rifle sling for comfort during long walks to and from the stand. The end result is a classic single-shot hunting rifle with modern optics and performance.
Recommended Accessories and Wrap-Up
Caleb concludes by praising the simplicity and reliability of the Henry single-shot rifle platform. It delivers excellent accuracy, rugged construction, and a timeless design that appeals to hunters who prefer traditional firearms.
For those looking to set up their own Henry rifle, all the parts used in this build—including the EGW base, Burris Z-Rings, and Burris Fullfield E1 scope—are available through Brownells.com.
He encourages viewers to reach out to the Brownells Tech Line for additional help with mounting, sighting, or selecting the right gear for their hunting setup.