Product Spotlight : The Best Glock Clone For Builders
In this Brownells Tech Tip, Caleb takes a close look at SCT frames and explains why they are one of the best values available for a Glock®-pattern pistol build. The goal of this video is not just to show the frame itself, but to walk through a complete bench-side build using commonly upgraded parts and practical component choices.
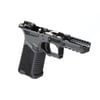
For shooters who want a custom pistol without paying premium factory prices, an SCT frame gives you a strong starting point. These frames accept standard Glock® magazines and a wide range of aftermarket Glock® parts, which makes them a flexible option for everything from a basic range gun to a suppressor-ready defensive setup.
SCT FRAME OPTIONS AND WHY THEY MATTER
Caleb starts with a 17-size SCT frame in flat dark earth, but points out that these frames are available in several colors and configurations. He also shows that magwell adapters are available, which gives the builder more room to tailor the finished pistol to a specific role or handling preference.
Beyond the full-size frame, he also highlights slimline options, including a 43X-size format that would make a solid concealed carry build. That wide range of frame sizes is one of the biggest strengths of the SCT lineup. Whether the goal is a duty-style pistol, a compact Glock® clone, or a lighter carry gun, there is a good chance an SCT frame fits the job.
PARTS KIT OVERVIEW FOR A GLOCK®-STYLE BUILD
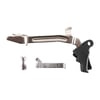
Once the frame is on the bench, Caleb lays out the major parts needed to complete the pistol. That includes the frame, a frame parts kit, a slide completion kit, upgraded controls, a slide, barrel, sights, and optic.
The frame kit he uses is a basic internals kit that leaves out a few of the parts many builders replace anyway. Specifically, it does not include the trigger, trigger bar, slide lock, or magazine catch. That is a smart way to save money when the plan already includes upgraded components.
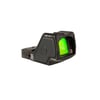
To complete the frame, Caleb uses an Apex enhancement kit, a factory Glock® extended slide catch, and a factory Glock® extended magazine catch. For the top end, he pairs the frame with a Brownells premium Glock® 17 slide, an Agency Arms threaded barrel, Ameriglo suppressor-height sights, and a Trijicon RMR.
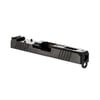
BROWNELLS PREMIUM GLOCK® SLIDE FEATURES
Caleb spends a little time comparing the Brownells premium Glock® slide to the standard Brownells slide. Both offer optic-cut configurations, but the premium version uses a different steel and has a more refined cut pattern. He also makes the important point that the standard slide is still a strong performer, even after heavy use.
That matters for anyone pricing out a custom Glock® build. Builders can choose a more affordable slide and still end up with a reliable pistol, or step up to the premium version for upgraded material and styling. Either way, the platform remains accessible.
He also notes an important detail for optic mounting. The slide includes the correct mounting screws, with different lengths depending on whether the builder is using only a cover plate or mounting an actual optic. When installing the Trijicon RMR, the screws that come with the slide are the ones to use.
INSTALLING THE MAGAZINE CATCH
The first frame component Caleb installs is the magazine catch and spring. This is a simple step, but it can look confusing if you have never worked inside a Glock®-pattern frame before.
He explains how the spring steel bar fits into the internal channel and how the magazine catch locks into place once the spring is pressed into the correct slot. The easiest way to verify correct installation is to press the magazine catch and confirm that it returns under spring pressure.
This step is a good example of the SCT frame’s compatibility with standard Glock®-style internals. The geometry is familiar, and once the builder understands how the spring engages the catch, the installation is straightforward.
ASSEMBLING THE FIRE CONTROL GROUP
Next, Caleb assembles the trigger, trigger spring, ejector housing, and connector. He uses the Apex trigger components rather than the standard connector, which helps reduce trigger pull weight and improve feel.
He shows how the trigger spring hooks into the trigger and rear housing, then installs the Apex connector into the housing. At that point, he adds a small amount of lubricant where the trigger bar rides against the connector. That contact point is important for smooth trigger movement and is worth paying attention to during assembly.
This is a key section for anyone trying to understand how a Glock®-style trigger group goes together. The layout is simple once assembled, but orientation matters, especially with the spring and connector.
SLIDE LOCK INSTALLATION AND ORIENTATION
The takedown lever, or slide lock in Glock® factory terminology, is another part Caleb slows down to explain. He points out that one side of the part is flat while the other has a channel that interfaces with the barrel’s locking surface. If installed backward, it will not work correctly.
The spring drops into its recess in the frame, and the slide lock is pressed into place over that spring. Once installed, it should move down and spring back up freely. This small check helps confirm that the part is seated and functioning the way it should.
DROPPING IN THE TRIGGER GROUP AND LOCKING BLOCK
With the small controls installed, Caleb drops the fire control group into the frame and makes sure the trigger shoe passes through the trigger opening properly. He then installs the locking block, which fits into the front of the frame and aligns with the larger pin hole.
This is where the SCT frame starts to look like a complete Glock®-pattern lower. At this point, the core internals are in place, and the next step is pinning everything together in the correct order.
UNDERSTANDING THE THREE GLOCK® FRAME PINS
One of the more useful parts of the video is Caleb’s explanation of the three frame pins and why installation order matters. He identifies the rear trigger housing pin, the locking block pin, and the larger trigger pin with grooves.
He notes that the first two pins are easy to install from either direction, but the grooved trigger pin is easier to install from the correct side because the slide catch engages those grooves to retain the pin. More important, installing the locking block pin first helps keep the slide catch spring in the correct position. If that spring sits in the wrong place, the slide catch will not function correctly and may cause problems during live fire.
That kind of detail is exactly what helps new builders avoid frustration on a Glock® clone project.
FINAL FRAME CHECKS
Once all three pins are installed, Caleb performs a few simple checks on the completed frame. He verifies that the slide catch springs back properly and that the magazine catch holds and releases a magazine as it should.
At this stage, the frame is complete and ready for the slide. The build has already covered the major internal relationships inside a Glock®-style lower, which makes the rest of the process easier to follow.
SLIDE PARTS AND STRIKER ASSEMBLY
The slide assembly begins with the striker system. Caleb lays out the striker, spring, spring cups, and spacer sleeve, then shows how to use the slide itself as a support while compressing the spring and installing the cups.
This is a practical trick and a useful one for first-time builders. Working with small spring-loaded parts can be awkward, and using the slide as a fixture makes the process more manageable.
After that, he installs the channel liner using the included tool. This part is pressed into the striker channel and does not require lubrication. That is an important point because the channel liner is meant to keep striker movement consistent without added oil or grease collecting debris.
EXTRACTOR, PLUNGER, AND BACK PLATE INSTALLATION
From there, Caleb assembles the extractor spring components, installs the safety plunger and spring, drops in the extractor, and inserts the striker assembly. He then secures everything with the slide back plate.
He also explains how the back plate locks against the striker assembly and extractor plunger, along with how to remove it later for maintenance. This is one of those areas of a Glock® slide that can seem intimidating until you see the parts go together in sequence. Once broken down, it is a very logical design.
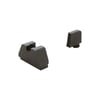
INSTALLING THE SIGHTS WITHOUT A SIGHT PUSHER
For sights, Caleb uses Ameriglo optic-compatible Glock® sights. He installs the front sight with a dedicated Glock® front sight tool and applies thread locker to the screw. He reminds viewers not to over-torque that small screw because it can break.
For the rear sight, he demonstrates a manual fitting method instead of using a sight pusher. He stones the bottom of the rear sight carefully until it starts into the dovetail by hand, then uses a nylon punch, hammer, and padded vise to drive it into position. The goal is an even gap on both sides so the rear sight ends up centered in the slide.
That method is practical for builders who may not own expensive dedicated sight tools but still want to install steel sights correctly on a Glock®-pattern slide.
BARREL, RECOIL SPRING, AND FINAL SLIDE ASSEMBLY
With the sights installed, Caleb lubricates the key friction surfaces on the Agency Arms threaded barrel and drops it into the slide. He adds a bit of oil to the recoil spring assembly, making sure the correct end faces forward, and snaps it into place against the barrel lug.
That completes the slide assembly. From there, he lubricates the frame rails and installs the finished slide onto the SCT frame.
FUNCTION CHECKING THE FINISHED GLOCK® CLONE
Once the pistol is assembled, Caleb performs a full function check. He verifies trigger movement, reset, and return to battery. He also makes sure the slide cycles fully and that the connector and recoil spring setup are working together correctly.
The pistol passes these checks without any fitting or troubleshooting, which reinforces one of the main themes of the video: using quality parts in a Glock®-compatible build usually makes the process go smoothly.
OPTIC, SUPPRESSOR, AND WEAPON LIGHT SETUP
To finish the pistol, Caleb mounts a Trijicon RMR using the longer screws provided with the Brownells slide and applies a small amount of blue Loctite. He also notes that the optic cut includes indexing features to help secure the optic under recoil.
After that, he threads on a Dead Air Mojave 9 suppressor and adds a SureFire X300 Ultra weapon light. At this point, the build has gone from a bare frame to a fully configured suppressor-ready Glock®-style pistol set up for modern use.
OPTIONAL .22 LR CONVERSION
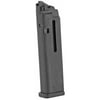
Before wrapping up, Caleb shows another interesting path for SCT frames: converting them to .22 LR with an Advantage Arms conversion slide. Using a complete Glock®-pattern frame and the correct conversion kit, the shooter can swap to a rimfire setup simply by changing the slide and magazine.
That makes the SCT platform even more versatile. A shooter can build a centerfire 9mm pistol and still have the option to run a lower-cost rimfire training setup using the same frame.
FINAL THOUGHTS ON SCT GLOCK®-PATTERN BUILDS
This video does a good job showing why SCT frames are such a strong value for builders who want a custom Glock®-style pistol. They are affordable, compatible with standard Glock® magazines and many aftermarket Glock® parts, and flexible enough to support full-size, compact, slimline, suppressed, and even rimfire configurations.
The completed build in this video combines an SCT frame, Apex trigger components, Brownells premium Glock® slide, Agency Arms threaded barrel, Ameriglo sights, Trijicon RMR, Dead Air suppressor, and SureFire X300 Ultra. It is a practical example of how to build a feature-rich Glock® clone without overcomplicating the process.
For anyone considering a first custom pistol project, this walkthrough gives a clear look at how the parts fit together, where common mistakes happen, and how to assemble a reliable Glock®-compatible pistol from the bench.